Screen Printing on Jeans: Step-by-Step Process
Screen printing, also known as silk screening, is a popular method for decorating garments, including jeans. It offers a unique way to personalize denim with intricate designs, logos, patterns, or text. While screen printing on t-shirts and other flat fabrics is common, applying this technique to jeans presents some unique challenges due to the material’s texture and thickness. However, with the right tools, techniques, and careful attention to detail, screen printing on jeans can result in stunning, long-lasting designs. Here’s a step-by-step guide on the screen-printing process for jeans.
Step 1: Choose the Right Jeans
The type of jeans you choose plays a crucial role in the success of the screen-printing process. The most common and effective materials for screen printing are 100% cotton or cotton blends, as they allow the ink to adhere well. Jeans made from stretchy materials, like spandex or polyester, may not hold the ink as effectively, so it’s best to avoid them.
Make sure the jeans are clean and free from any dirt, oils, or residues that could affect the ink’s ability to bond with the fabric. Pre-wash the jeans to remove any sizing or chemicals that may have been applied during manufacturing.
Step 2: Prepare the Design
Before you begin printing, you need to create a design that will be transferred onto the jeans. This is done using a stencil or screen. Start by creating your design digitally using graphic design software like Adobe Illustrator or Photoshop. If you’re a beginner, you can start with simpler designs that are easier to transfer.
Once your design is ready, it will be transferred onto the screen. The screen is a fine mesh stretched tightly over a frame. You’ll need to apply an emulsion to the screen and expose it to light while the design is placed on top. The light will harden the emulsion except where the design blocks the light, creating a stencil.
Step 3: Set Up Your Workspace
Screen printing on jeans requires a stable workspace with all the necessary tools within reach. Some essential items include:
- A screen with the desired design burned into it
- High-quality screen printing ink designed for use on denim or fabric
- A squeegee to apply ink to the screen
- A heat press or curing machine for setting the ink
- Adhesive spray or clamps to keep the jeans in place
Make sure the area is well-ventilated and free of dust and debris, as any particles can interfere with the printing process.
Step 4: Position the Jeans and Screen
Once the design is ready and your workspace is set up, it’s time to position the jeans. Use an adhesive spray to lightly coat the jeans where you’ll be printing. This helps keep the fabric in place and prevents movement during the printing process. Alternatively, you can use clamps or tape to secure the jeans to a flat surface.
Position the screen with your design over the area of the jeans where you want the print to appear. It’s important to ensure that the screen is aligned correctly so the design will be centered and printed evenly. For large designs that span across both legs, you may need to print each leg separately to avoid distortion.
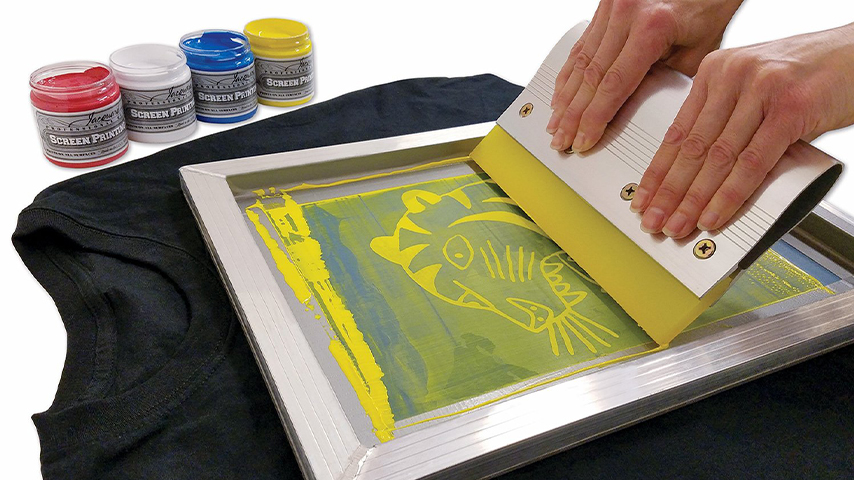
Step 5: Apply the Ink
Now it’s time to apply the ink. Choose a high-quality ink specifically designed for use on denim or fabric. Water-based inks are a popular choice for jeans, as they create a soft, flexible finish that bonds well with denim fibers. Plastisol ink is also commonly used for its durability and bold, vibrant colors.
Using a squeegee, apply a generous amount of ink at one end of the screen. Hold the squeegee at a 45-degree angle and pull it across the screen, applying even pressure as you drag the ink over the design. The ink will pass through the stencil and onto the fabric, transferring the design onto the jeans.
If you’re working with a multi-color design, you’ll need to repeat this process for each color, ensuring the jeans are properly aligned with the screen each time. Let the first color dry before applying additional layers to avoid smudging.
Step 6: Cure the Ink
After applying the ink, the next step is to cure it so that it bonds permanently to the fabric. This is typically done using a heat press or a conveyor dryer. For water-based inks, curing temperatures are usually between 320°F and 350°F, while plastisol inks may require higher heat settings.
If you don’t have access to a professional curing machine, a heat gun or even a regular household iron can be used, though it may not yield the same durable results. Properly curing the ink is essential for ensuring the print’s longevity, especially since jeans are subject to heavy wear and frequent washing.
Step 7: Inspect the Final Product
Once the ink is cured, inspect the print for any imperfections, such as uneven ink application or smudges. If you notice any mistakes, you may need to repeat the process or use touch-up techniques to fix minor flaws. Test the durability of the print by gently stretching the fabric or washing the jeans to ensure that the ink doesn’t crack or peel.
Step 8: Final Wash and Finishing Touches
Once you’re satisfied with the print, give the jeans one final wash to remove any excess ink or adhesive. This also helps soften the print, giving it a more natural look and feel. After washing, let the jeans air dry or tumble dry on a low setting.
Conclusion
Screen printing on jeans offers a fantastic way to create customized denim with bold, unique designs. While the process requires precision, patience, and the right tools, the end result can be striking and highly durable. By following the steps outlined above and using high-quality materials, you can achieve professional-level screen-printed designs on jeans that will last for years, whether you’re creating personalized fashion pieces or producing custom merchandise for a brand or business.

")


Leave a Comment